Wood Slats, What’s That?

Tambour panels, wood cladding and the wood slat trend, what’s it all about and why is everyone talking about it?

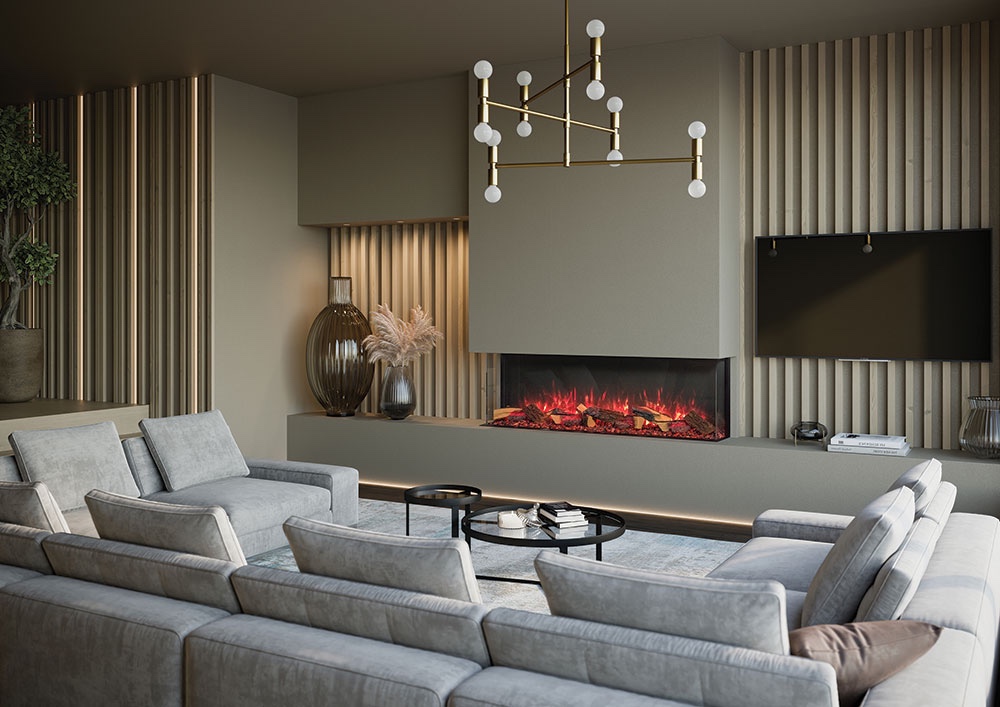
Say hello to the latest interior design trend making waves, timber panels and slatted wood accents. Delivering a subtle texture to walls in homes this trend has finally made its way from commercial to residential properties. Until recently we’ve only seen timber cladding and tambour as an exterior siding, but as of late, it’s creeping into the interior realm in the form accent walls, furniture and décor.

This new look takes on a minimal and Scandinavian approach using raw and unfinished wood. Adding a three-dimensional impression, warmth and texture to any surface, it’s easy to see why this design element is fast growing in popularity. Perfectly complementing the loft and eco interior design trends, we could even see this effect used in maximalism décor too. It adds character and a focal point to accent walls, adds depth to space and introduces a new lighting dynamic. It also adds value in the premium feel it delivers.

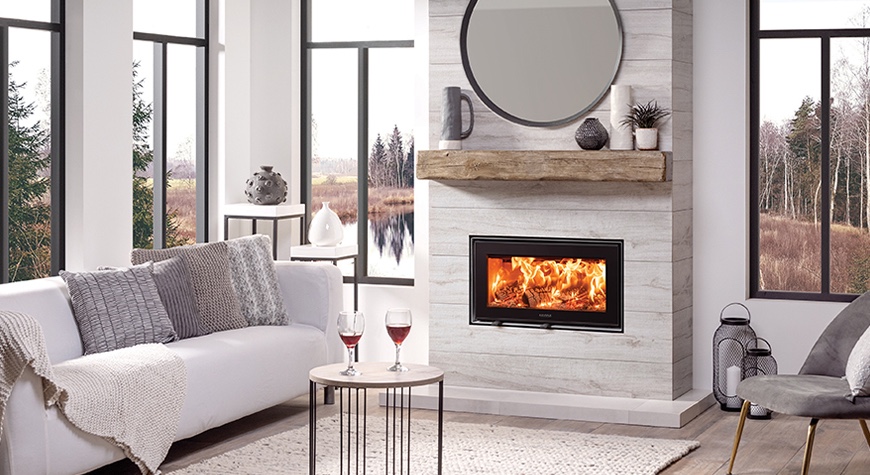
Tambour wood, also known as weather boarding, timber siding and wood slats, is most commonly used as siding on modern and contemporary builds. The Thistle Foundations new Health and Wellbeing Centre in Edinburgh is a great example. It’s most easily described as thin strips of wood, that stretch vertically from the ceiling to floor. Equally spaced at around ½ an inch to two inches between each piece, the spaces are normally less than the width of the slats. Although the most common orientation is vertical strips, you can also install the slats horizontally to elongate small spaces.

The easiest way to incorporate this trend into your interior design is to either add an item of furniture that has the slated wood look or by using tambour wood panels to create an accent wall. These can either be left unfinished for a Scandinavian feel or painted for a subtle look.

To use this effect in a loft style designed space keep it chic and team with concrete accents such as plant pots and dishes to balance the natural wood with an industrial texture.

Mimic the straight lines with stripes on patterned soft furnishings such as cushions and rugs in maximalism themed interiors. Consider painting them the same colour as your wall, the looks especially effective in dark colours such as deep green and navy.

If eco-style is more your vibe, keep the walls white or even consider installing that tambour panels on your ceiling for an entirely different approach.

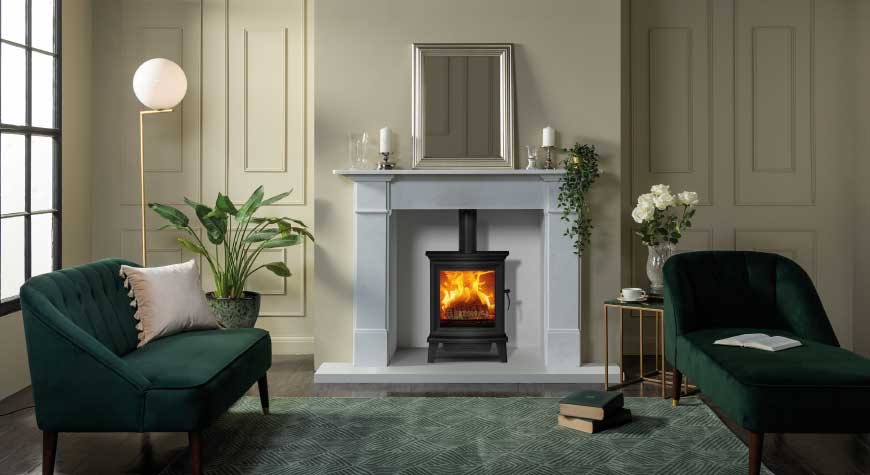
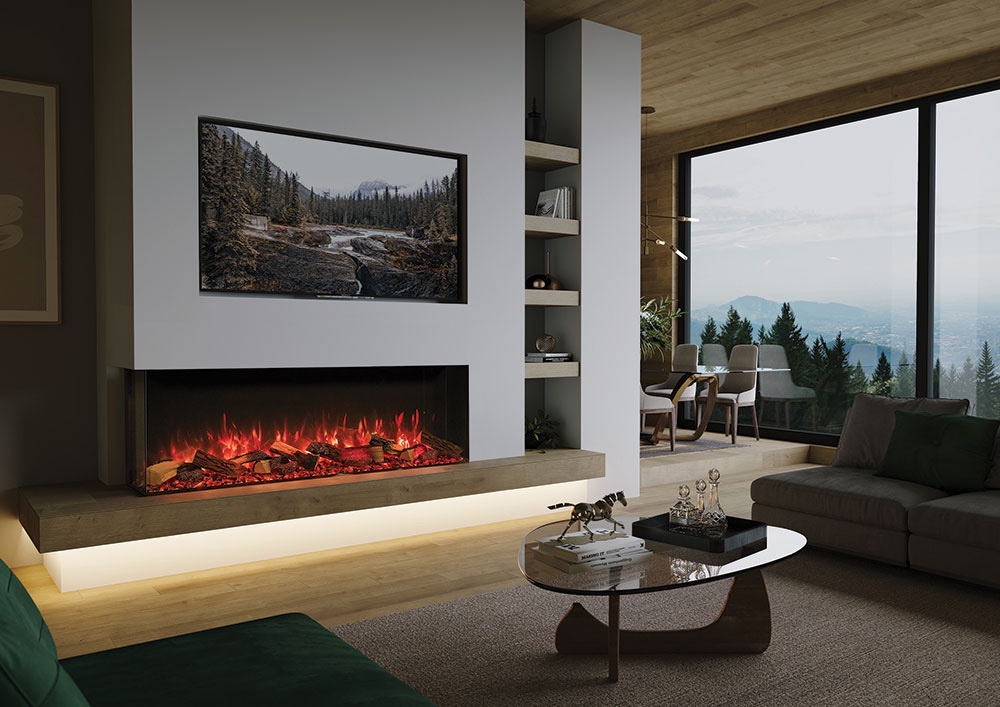
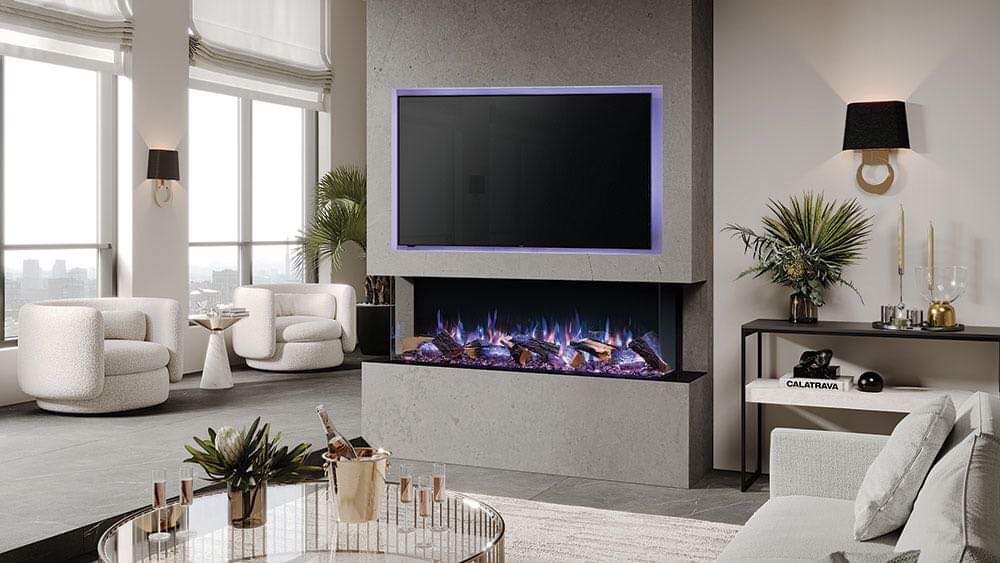
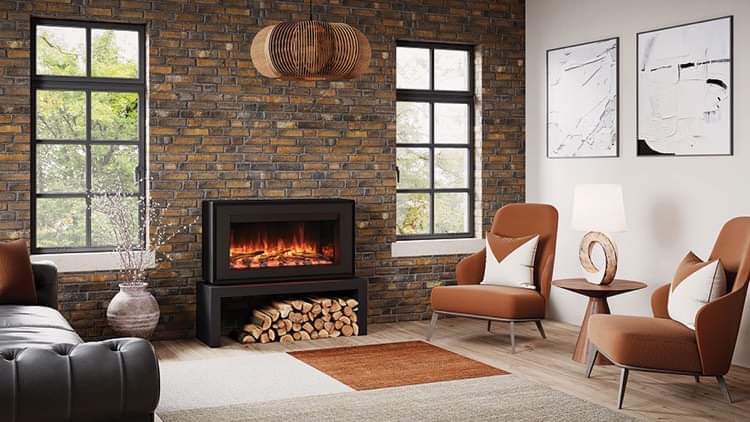
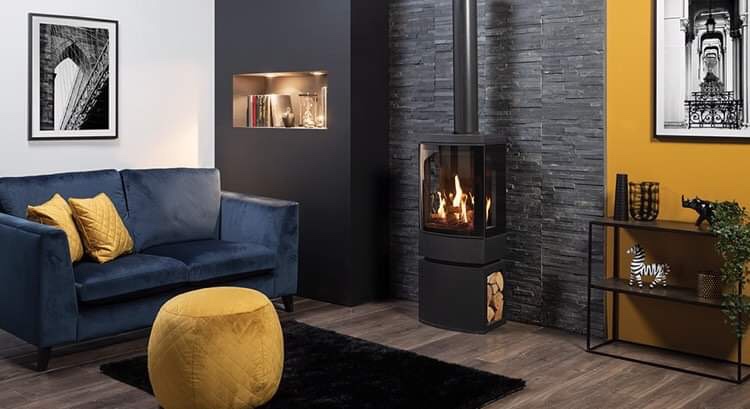
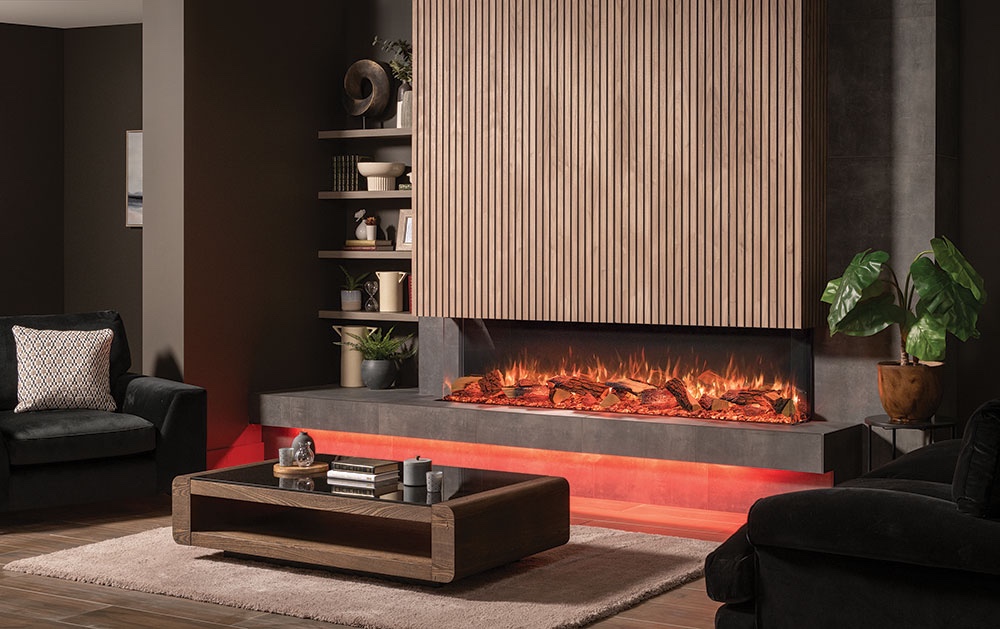
From hall ways to room dividers, dining areas to bedrooms, the creative possibilities with this effect are endless. We’re bias but we like it best on a media wall where the light from the fire can add another dimension to this characterful trend.

The Ultimate Cheese Pizza Recipe

Did you know that 9th January is National Pizza day?! The perfect excuse to fire up your pizza oven and join in with the celebrations. “Hold the toppings!” That’s right, cheese is all you need when celebrating this pizza holiday.

There is nothing more rewarding than baking your own pizza in a wood-fired oven, especially if you are making a classic Brooklyn styled cheese pizza. Those lovely charred spots dotted all over a perfectly puffed up pizza crust are pure food heaven. Simplicity is all about the quality of ingredients, so make sure you buy it fresh and local where possible.

Is your mouth watering yet? Ours certainly are! We’ve scoured the review sites, the forums and the chat groups to discover the ultimate wood-fired cheese pizza recipe just for you to enjoy on this momentous occasion! Don’t worry, it can be baked in a conventional oven too.

WOOD-FIRED CHEESE PIZZA
(adapted from Jamie Oliver’s Wood-Fired Pizza recipe and inspired by the research from the team at Manna from Devon).

Ingredients

FOR THE PIZZA BASE:
• 1 kg strong white bread flour, (or 800g strong bread flour mixed with 200g semolina flour)
• 1 level teaspoon fine sea salt
• 2 x 7g sachets of dried yeast
• 1 tablespoon golden caster sugar
• 4 tablespoons extra-virgin olive oil

FOR THE TOMATO SAUCE:
• 4 cloves of garlic
• olive oil
• 1 bunch of fresh basil
• 3 x 400g tins of whole plum tomatoes
• sea salt
• freshly ground black pepper

FOR THE TOPPING:
• Mozzarella – 1/2 ball per pizza or more if you like it extra cheesy. It’s recommended to break up your mozzarella balls and drain in a sieve over a bowl for 6 hours, or overnight, prior to baking your pizza. Pre-grated mozzarella can also be used although it’s not as stringy and can be quite dry.
• Parmesan – approximately 200g, again more is best when you love cheesy pizza!
• Fresh basil leaves

Method

• Start with the tomato sauce; peel and finely slice the garlic, then fry in a good amount of olive oil until lightly coloured. Pick and tear the basil leaves, then add to the pan with the tomatoes. Using the back of a wooden spoon, mush and squash the tomatoes as much as you can. Season to taste.
• As soon as it comes to the boil, remove the pan from the heat. Strain the sauce through a coarse sieve into a bowl, using the spoon to push any larger bits of tomato through. Discard the basil and garlic left in the sieve, but scrape any tomatoey goodness off the back of the sieve into the bowl. Pour the sauce back into the pan, bring to the boil, then lower the heat and simmer for 5 minutes. Cook until it’s the perfect consistency for spreading on your pizza bases.
• For the pizza dough, sieve the flour and salt onto a clean work surface and make a well in the middle. In a jug, mix the yeast, sugar and olive oil into 650ml lukewarm water and leave for a few minutes, then carefully pour into the well. Using a fork, bring the flour in gradually from the sides and swirl it into the liquid. When it all starts to come together, work the rest of the flour in with your clean hands. Knead until you have a smooth, springy dough. Place the ball of dough in a large flour-dusted bowl and cover with a damp cloth and place in a warm place for an hour until the dough has doubled in size.
• Remove the dough to a flour-dusted surface and knead it around a bit to push the air out. You can use it immediately, or keep it, wrapped in clingfilm, in the fridge (or freezer) until required. If using straight away, divide the dough up into 6 to 8 balls.
• Timing-wise, it’s a good idea to roll the pizza bases out about 15 to 20 minutes before you want to cook them. Stack the pizza bases, with a square of oiled tin foil between each one, cover them with clingfilm, and pop them into the fridge. Now’s the time to check your wood-fired oven, or conventional oven, is fully heated up to optimum temperature (around 400°c). Place a couple of heavy baking trays in the oven to heat up, too.
• When you’re ready to assemble your pizzas, remove a tray from the oven, put a pizza base on it and assemble it quickly – smear tomato sauce on the base tear over the cheese and sprinkle with ripped basil. Place in the oven immediately while you prepare the remaining pizzas. If you’re using a wood-fired oven the pizzas should cook, one by one, in about 3 to 4 minutes – you want them to be puffed up, crispy and delicious. In a regular oven, they’ll take 8 to 10 minutes.
• Serve hot and marvel at how delicious a few simple ingredients can be.

Mirrors Over Mantels

Mirrors have a long and interesting history that stretches across the world and dates back centuries. And despite their transition from a rare object only owned by the very wealthy to a common household possession, the mirror is still a highly popular item of home decor. But why do we hand them over fireplaces? Is there a superstition, a reason, a history?

A BRIEF HISTORY OF THE MIRROR.

Techniques for creating mirrors advanced along with society. It was the Venetians that truly popularised mirrors as we know them today. In 1680 came the ability to produce large single sheets of glass and mirrors were made by coating the glass with a mixture of tin and mercury.

As a general rule, mirrors created before this period tend to be slightly smaller, or created from multiple panels of mirrored glass. The success of Venetian mirror makers was the envy of Europe, to the extent it was said that the French court of Louis XIV sent spies to Venice to steal their secrets. The spies must have been successful as France soon became renowned mirror makers in their own right.

The French did not keep as tight-lipped as the Venetians about their mirror-making secrets, and techniques spread to other countries soon after. In the early 19th century, a new, safer method of mirror-making was invented, using silver nitrate to replace the highly toxic mercury. Today we use aluminium in mirrors. It’s lighter, and cheaper, and crucially, not poisonous!

MYSTERY AND MYTH

You may think it a mystery as to why displaying a mirror above a fireplace is often suggested in home decor guides. Given thought, it can appear a dangerous idea to want to see your own reflection above a fire and that a piece or art would be far better suited in this location.

There is a myth that this trend dates back to a time when knights of old were once crowded around the fire on a cold night and were ambushed whilst their backs were turned. From this event onwards the rich installed mirrors above the fireplace so that they would not be compromised or vulnerable to attack again. However, the dates of large mirror manufacture and knights in castles simply don’t align, but it does make for a great fireside tale!

FROM TREND TO TRADITION

Not only do mirrors amplify natural and electrical light, they are masters of illusion; making spaces appear and feel so much bigger than their physical dimensions. From the start of using reflective surfaces in interior design, mirrors have been deliberately positioned to allow additional light to be brought into the room.

As previously mentioned, mirrors were extremely expensive, especially the larger variety. Due to their extreme value everyone wanted to showcase them as a centrepiece. The wonderment created at the royal palace at Versailles was highly influential of the trend for mirrors to adorn the walls in state rooms.

Overmantel mirrors became the must have home accessory during the Regency Period, 1811 to 1820. Architects began to lower fireplace mantels to make room for ever-larger horizontal mirrors. Often these were enhanced by gold frames, elaborate carvings, candelabras and additional smaller mirrors. Vanity was alive and thriving long before celebrity culture, but our noble forebears had to settle for mega mirrors rather than selfies!

The tradition of incorporating a mirror into the space over the mantelpiece soon became established: many of the early versions of these mirrors, usually known as overmantels, were enclosed in glass frames. The mirror was a status of wealth and the frame a reflection of taste.

A MODERN TREND

Now considered a classic look and a neutral solution on what to place over your mantel, there are other reasons why hanging a mirror above your fire is a good idea. The right mirror can make a room seem bigger and brighter, it can also create a bold and dramatic feature.

Choosing the right mirror is key to ensure that it doesn’t lack in personality and hanging something of interest on the opposite wall can give the mirror a practical value too. The idea of hanging a mirror above the fire is to enhance positive room features; it’s also an auspicious Feng Shui practice to place a mirror over a fireplace as the water element of the mirror balances the fire element, thus bringing in good energy into the room.

In conclusion, there is a rich history to hanging a mirror over a mantelpiece and it’s an interior practice that isn’t going anywhere soon. The many unique styles of mirror available on the market make it a great item to create an attention-demanding centrepiece in any room.

Our Top 5 Fires of 2021

2021 was a great year for new fires, with great strides being taken in Ecodeign technology and innovative design. Here we showcase our 5 favourites that stood out from the crowd.

NO. 1 THE LIBERTY 85

A free standing electric fire from Gazco. A bold freestanding design, with the convenience of an electric fire, delivering ambience, warmth and style. This is a contemporary fire that is designed to make a statement.

Featuring advanced Chromalight technologies to create a mesmerising flame picture and ember bed up-lighting that can be enjoyed with or without the heat. An ideal choice for media walls and with two sophisticated finishes, the Liberty provides you the freedom to tailor it’s look to your living space. You can also choose from either black or white finishes, and can co-ordinate this with a matching plinth or bench mount to elevate your electric fire. A selection of fuel effects help you personalise its look even further to fit your interior.

NO.2 THE OYNX LIV 3

A gas stove combining a sophisticated cylindrical design with stunningly realistic flames and log effects. With innovative engineering and design, the Oynx Liv 3 is an unmistakably contemporary centerpiece adding poise and allure to any interior. With a heat output of up to 4.5kW and thermostatic remote control, we love that these quality stoves don’t only look great but are highly efficient too.

Front and side glass panels showcase the Oynx Liv 3’s panoramic flames, providing 180˚ views for maximum visibility. Inside, the flame burner technology creates a tall fire which dances through a highly realistic log effect fuel bed. Conventional flue and balanced flue options mean that this stove can also be installed with or without a chimney.

NO.3 THE AVANTI ELECTRIC

The all new, award-nominated, luxury designer-brand of fires from Stovax and Gazco, is an inset electric fire range.

Designed to offer tailored ambience and representing the very highest level of innovation available in modern electric fires, these premier fires are available in three sizes. Each size has a variety of installation options. The Avanti 110RW, Avanti 150RW and Avanti 190RW are all available in a single, corner or three-sided fire configuration and to give your fire its own bespoke feel, the Avanti range offers you a choice of true-to-life Split Oak or optional Split Silver Birch log fuel-effects.

NO.4 FUTURA 5

A Real Homes Awards 2021 nominee, this wood burning and multi-fuel stove from Stovax ticks all the eco boxes, is incredibly efficient and the fame visuals are outstanding.

The Stovax Futura 5 stove prioritises spectacular flame visuals and high efficiency heat. Designed and engineered in Britain and the result of over four decades of British stove engineering, the Futura 5 represents the cutting-edge of Ecodesign wood burning and multi-fuel stove design. Delivering flair and function with its state of the art engineering and minimalist design.

NO. 5 STUDIO AIR 2

A freestanding, wood burning fire with unsurpassed flame visuals in its category. A contemporary, Ecodesign ready fire with high performance heating and a touch of luxury.

Offering an impressive 8.2kW heat output and featuring a heat shield for reduced distance to combustibles, this fire uses state-of-the-art presions airflow combustion systems to effortly exceed Ecodesign standards.

For enhanced visual grandure the freestanding Studio Air 2 can also be mounted on a Stovax stove bench. Available with black, white or storm grey trims to suit your interior.

What to Look Out For in 2022

It’s that time of year where we talk about trends and look at what’s set to be the next big thing in the world of stoves and fires. Below we look at 4 fireplace design trends that we’re already seeing utilised in new projects and we‘re pretty certain these will continue to surge in popularity in 2022!

SIZE MATTERS…

When it comes to size, it definitely matters in 2022 fire choices! Big and bold statement fires are seeing a rapid rise in popularity with many embracing the freedom to upsize in contemporary layouts. Oversized fireplace designs make a big impact, quite literally, and create a wonderful focal point. Glass panels on stoves are now bigger and wider than ever too, so you can really enjoy the beauty of a log fire compared to more traditional compact designs.


This popularity surge extends into electric fires too. As media walls also continue to trend so do large fireplaces to mirror the size of the screens. The wider the better!

OUT WITH THE OLD

Behold the mesmerising aesthetics of the clean precise lines of a thin, oblong fire. We are seeing more and more clients embrace narrow fires and horizontal deigns.

A natural progression from the popularity of linear fireplace. Long skinny fireplaces really lend themselves to an symmetrical design, and lines can be mirrored with a shelf or bench mount. These fires are ideal to create an impression of a longer room and, as often available in electrical wall mounted options, they’re great for homes short on floor space too.

RETURN TO TRADITIONAL

The polar opposite to above, we’re treasuring that so many people appreciate original fireplaces and are embracing them within their home designs. Whether you’re giving an original a makeover or installing a new fireplace with a timeless and classic design, we’re seeing a big lean in recent months to favouring vintage styles and expect this to continue into the new year.

FIRE THAT DOESN’T HEAT UP THE PLANET.

As we all become more aware of decreasing our carbon footprints in any way possible to us, energy efficiency and eco credibility have become essential features when shopping for a fireplace.

Stovax fires continue to be one of our most popular brands with a wide range of wood-burning and multi-fuel Ecodesign stoves and fires. Lowering emissions to an absolute minimum, their cutting-edge designs make them some of today’s cleanest burning fires. Ecodesign Plus stoves represent the future of wood burning. Supporting the governments Clean Air Strategy, these advanced stoves burn so cleanly they meet, and in many cases even exceed, 2022 air quality and efficiency targets.

Interior Design Trends for 2022

Pantone have already announced the official colour of 2022, Very Peri, and we’re excited to see how it transfers in to the forecast interior trends of the year. We’re looking ahead to see how you can take inspiration from these new ideas to personalise your interiors, design to suit lifestyles, incorporate different tastes and reflect moods.


ECLECTIC


Eclectic style is taking the lead in the interior trends of 2022. A natural progression from maximalism it embraces combining styles, some often thought incompatible, and doing it with creative flair. Like maximalism, this style isn’t about chaotic mess, it’s a busy look that has a connecting link between items through shape, colour and texture.


If you chose to have mismatched furniture and soft furnishings then the key to achieving this trend is to keep your wall, floor and ceiling decoration to a minimal.


ECO-STYLE


Eco-style arrived in our homes almost a decade ago so it’s overdue a new surge in popularity. More relevant than ever, its topping the 2022 list of interior design trends.


This style is ideal for those who favour freedom and light in their living spaces. Organic colours and materials, simple yet functional furniture. Traditional colour schemes are calm and natural utilising natures colour palette with warm earthy shades, beige, white and green.


Natural textiles lend themselves to this style with some new twists being brought in for 2022. Aged and stained wood is making a comeback, unpolished concrete, terracotta and brick are all popular materials to feature too.


LOFT STYLE


Characterised by high ceilings, wooden or metal staircases, wood burning stoves and a combination of modernity and classics (for instance, designer wood furniture and aged mirrors) this is the new industrial chic.


Urban, rustic and an easily achieved look for those on a budget. Stripped back floorboards and old brick walls all look great when paired with modern lighting and furniture.

If you don’t live in an older building with traditional brick walls, there are fantastic brick effect wallpapers on the market which will help you to achieve this style without breaking the bank.


HIGH-TECH STYLE


Minimalistic, modern and futuristic.
It’s time to get serious about storage when it comes to this style, it’s all about the cutter-free, clean and stylish aesthetic.


Get your tech on, this trend is all about the mod-cons. Media walls, electric fireplaces and remote control blinds. App controlled lighting built into furnishings is a great way of taking things a step further and embracing this almost futuristic look.


Accent the main hi-tech colours of grey, white and black with bold accent colours. Pick one as a basis and build your design around it. Glass, mirror and gloss tiles are all materials that will work will within the theme.


COLOUR BLOCKING


Colour blocking is experiencing a third surge of popularity in 2022. This technique came into interior design from fashion catwalks. It involves creating an image of a room by using large colour spots (blocks).


The idea is simple: you need to highlight a few large items and supplement them with details. For example, a cabinet or sofa can appear as a large colour spot. And they will be supplemented by armchairs and décor. The aim is to select items and colours that contrast so that they do not merge with the general background.


Prints are rarely used and if you do chose to incorporate these within the style, simple abstract or geometric designs work best.
It must be emphasized that colour blocking does not involve working exclusively with bright colours. Pastel shades also look very impressive.

Let It Snow, Let it Snow, Let It Snow – Glamping in The Winter

Unlike camping, which for the recreational seasonal campers among us is maybe hard going in winter, glamping in the cold is a much more luxurious experience. Glamping is an activity that isn’t dependent on the seasons especially since the introduction of glamping stoves. The addition of wood burning stoves into yurts, barges and huts has certainly taken glamping up a notch or two on the comfort scale! Summer camping can be too warm for a fire, but in winter its perfect!

Here’s some of the many reasons we love glamping in the winter.

1. THE SCENERY

Scottish scenery is stunning all year round but add in an autumnal palette to a native forest or a thick frost over the mountains and it is undeniably breath-taking. Star gazing under the clear winter skies is an unforgettable experience with a much higher chance of seeing the Mirrie Dancers (Northen Lights) too! Crisp mornings, still lochs and an incredible stillness create a truly magical winter wonderland.

2. COSY PUBS

We can’t write about winter glamping without talking about the joy of sitting by the roaring fire in a rural pub after a long walk. While it’s great to be warm and snug in a glamping pod in the winter, it’s even better to head out on a long bracing hike to a cosy, welcoming pub. Then enjoy some home cooked, classic pub grub and a craft ale, or whatever takes your fancy, before walking back home knowing your own stove awaits you there!

3. THE DARK MORNINGS

Amongst the hectic hustle and bustle of the season we often forget to stop, unwind and relax. Dark mornings can be a grind during the working week, oppressive and un-motivating. But the dark mornings on holiday? Hello relaxing, long lie-in! Winter glamping means no waking up with the dawn chorus at a 5am sunrise and with a bit of luck it keeps any accompanying pets and kids sleeping in a little longer too.

4. THE WINTER WALKS

We know we’re mentioning it a lot but winter sun makes walking at this time of year magical. The trees glisten, the hills glow and the skies are refreshing, there’s something about frosty country air that fills your lungs and makes you feel alive. Winter walks out in nature, whatever the weather, makes the return home to your cosy space even more enjoyable. Especially so if you have a beautiful wood burning stove to welcome you. The other great thing about glamping in the winter is it’s usually cheaper, and you have a wider choice of accommodation. If you love the great outdoors, and being out in nature, but want to enjoy the warmth and comfort of being in-doors, then try glamping!

Learn more about the Eco Glamping Stove here

Christmas Fire Safety Tips

The weather outside is frightful but the fire is so delightful…but only when you know it’s safe.

As the nights draw in and we fill our homes with warmth, lighting candles and fires, it’s wise to remember the dangers of a live flame. Christmas is one of the most dangerous times of year for house fires and UK Home Office fire statistics show that fires are most common in December with candles being the fourth highest cause of accidental house fires.

A little preparation and planning can help you avoid having your holidays and home ruined during the festive season. Below we take a look at some of the most common fireplace risks found in the festive period and list some top tips for keeping you, your loved ones and your home safe this Christmas.

CHRISTMAS TREES

Be careful not to place your tree too close to the fireside, whether real or fake they can pose a serious fire risk. Keep your tree in an open area at least 3 feet away from any heat sources, make sure it isn’t blocking any exits and be careful if lighting any candles nearby.

If you’re choosing a fresh tree, choose one with a healthy green appearance and avoid any that have dry or brown needles that fall off when touched. Keep your tree in a pot or tree stand and water it daily.

If selecting or re-using an artificial tree, make sure it is labeled, certified or identified by the manufacturer as fire retardant.

CHRISTMAS LIGHTS

It goes without saying that electrics and live flames don’t mix. Mantel garlands with fairy lights may look magical but they pose another serious fire risk. If you do chose to use one, just as with candles, do not leave it unattended. Another alternative is to only use these when the fire isn’t lit.

Never leave Christmas lights on when you’re sleeping or out of the house. We’re all seem the Mog Christmas Calamity advert…

CANDLES

If you’re using candles at Christmas, make sure you take extra care to use them safely. Blow out candles before leaving the house or going to bed and make sure you only light them in open, visible spaces. If you have children around, it might be best to leave the candles up high so small hands can’t grab them.

If in doubt, avoid using candles altogether. LED, flameless candles offer a much safer alternative to real candles and will keep flickering for much longer than the real version too!

CHRISTMAS CARDS

Whether you hang your Christmas cards on the wall or display them on a shelf, make sure they’re kept well away from candles, fireplaces and other objects that could start a fire. It only takes one card falling down in a breeze to set a whole house alight.

TEST YOUR SMOKE ALARMS

Before the Christmas season begins, make sure your smoke alarms are working properly. Doing so could save lives should anything happen during the holidays. Never take your smoke alarms down or remove the batteries to use in toys, decorations or other gadgets around the home – your life is much more important.

The Fire is so Delightful

Maximise The Potential of Your Stove This Winter

If you’ve been following our blog and social media for a while, you’ll have heard us talk about Ecodesign Ready stoves. They have been designed to make sure they are incredibly efficient. An open fire has an efficiency level of around 20%. In comparison, an Ecodesign Ready stove has an efficiency level of around 80%. We need to be doing everything we can to lower our carbon footprint and increasing appliance efficiency is a great way to help.

The diagram below explains the efficiency of an Ecodesign Ready stove vs an open fire.

While an Ecodesign Ready stove is designed for maximum efficiency, there are things you need to be aware of, to make sure you are maximising the potential of your stove. Here are a few pointers to help you:

REFUELING YOUR FIRE

Place the logs into the centre of the fire, away from the rear, sides and glass. By doing this you are helping keep the glass and the liners clean. Make sure you use stove gloves or an oven mitt when opening the door, adding wood or adjusting the controls.

BURN THE RIGHT STUFF

Hardwood logs are undoubtedly the most healthy choice for your fire. Moisture content is critical too; the moisture levels in any burning wood should be no more than 20%. Too higher moisture (know as wet wood) will create an inefficient burn and increase the levels of tar in a flue, which in turn can increase the risks of a chimney fire and carbon monoxide poisoning. Look for Woodsure “Ready to Burn” quality assured wood. This assurance scheme brought in from May this year (2021) is to help unsuspecting buyers avoid purchasing “wet” wood.

You can read more about what woods to burn here

WHAT NOT TO BURN:

HOUSE COAL

The sale of traditional house coal (also known as bituminous coal) is being phased out in Scotland and is no longer easily obtained.

SMOKELESS COAL/BRIQUETTES

Over time the chemicals in the smokeless coal and briquettes can discolour the fire and can cause a range of other problems, as a result, it is recommended that you avoid these fuel sources. Want to know more click here.

PAINTED OR PRESERVED WOODS

Burning such wood can release very toxic chemicals into the atmosphere, which are a direct threat to air quality. Also, the chemicals can also damage and discolour the inside of your fireplace. Avoid at all costs.

NEWSPAPER AND CARD

A traditional fire starter but a major fire risk. Paper and card burn very quickly and can easily float up the chimney (when lit) and ignite creosote/tar currently residing in a flue, possibly causing a fire. Burning both should be avoided.

STORING FIREWOOD:

You should store firewood in well vented dry areas, that is well away from the rain. Stacking firewood is good because it helps promote air circulation. The last thing you want is to buy correctly seasoned wood only to trap in dampness!

Discover our great range of wood burning stoves.

Pizza Oven Christmas Treats

Christmas is just around the corner, which means it’s the perfect time of year to get those pizza ovens fired up and get creative. No, we’re not talking about cooking your entire Christmas roast (though that is possible!), we want to spread the festive cheer by giving you a few ideas for some easy peasy, tasty festive treats! These recipes are great for parties, nibbles and movie nights.

SHORTBREAD

Shortbread is a great snack to have at hand over the festive period. It pairs well with mulled wine, hot chocolates and a whole host of other ripples too! These shortbread stars are perfect for leaving out for Santa, a quick and easy homemade gift or perhaps you just want something yummy to nibble on Christmas Eve.

Ingredients(Makes 12 stars):

• 150g plain flour

• 100g butter

• 50g caster sugar

• 1tsp vanilla extract

Method:

  1. First you will need to fire up your oven to its optimum temperature, then allow it cool until it reaches around 130°c.
  2. Next you will need to mix the flour and butter into a bowl, until the mixture resembles breadcrumbs.
  3. Then pop in the sugar and vanilla extract and mix together until you have a ball of dough.
  4. Once the dough is smooth, wrap it in some clingfilm and chill in the fridge for about an hour.
  5. Whilst you are waiting for your dough to cool, line a high heat-baking tray with baking parchment.
  6. Next take your dough out of the fridge and roll out the dough on a lightly floured surface until it is around 1cm thick.
  7. Using a star cutter of your choice, cut out the biscuits and pop them onto your pre-lined baking tray.
  8. Next, place the biscuits into your wood fired oven for around 30 minutes, or until they are a pale gold colour.
  9. Whilst your biscuits are cooling, dust over some caster sugar for a festive finishing touch.

PIGS IN BLANKETS

Christmas isn’t complete without some scrummy pigs in blankets. Impress your party guests with this Christmassy nibble, honey-glazed pigs in blankets with cranberry dipping sauce. They are so delicious you may just want a plate full of these for Christmas dinner!

Ingredients:

• 60ml (4 tbsp) runny honey

• A pack of smoked bacon

• 900g (2 lb) good-quality chipolatas

• Cranberry Sauce (shop bought or homemade)

Start by firing up your wood fired oven to its optimum temperature and allow the oven to cool down to a roasting environment. Maintain the temperature at 200 degrees C.

Method:

1. Unless you have bought cocktail sausages, you’ll need to divide up your chipolatas.

2. Twist each one in the middle and cut in half.

3. Add them to the sticky honey in a large bowl.

4. When you are happy that all the sausages have a good coverage, tip the sausages and the sauce into a roasting tin lined with foil and cook in your wood fired oven for 30-40 minutes, turning occasionally.

Serve on a wooden board; you can add some Christmas decoration like a sprig of holly to be a bit fancy and place the cranberry sauce on the side in its glass jar for dipping!

CHRISTMAS CRANBERRY & BRIE PARCELS

A scrummy addition to any festive Christmas party spread!

Ingredients:

• Shop bought (17 1/4 ounces) frozen puff pastry, thawed

• 1 lb Brie cheese

• Cranberry sauce (purchased or homemade)

Fire up your pizza oven as per usual. Bring the oven up to maximum temperature. This recipe is perfect after roasting or pizza cooking as the oven is already hot and saturated with heat. Let the oven temperature gradually cool to baking temperature, for this recipe around 250° C. Sweep all the embers out and place the door in the doorway.

Method:

1. With a sharp knife or pizza cutter, cut the sheets into approximately 3 inch x 3 inch squares.

2. Press each square into a muffin cavity.

3. Cube the cheese – about a 3/4 inch cube for each (you may have a little cheese left over).

4. Place a cube of brie in the center of each puff pastry square. Top the brie with a small dollop (about 2 tsp) of cranberry sauce.

5. Bake for about 10 minutes or until puff pastry corners are toasted golden brown & the sauce and cheese is lightly bubbling for that authentic wood fired look!

Snowman Pizzas

Follow the pizza recipe on the blog below for a perfect pizza-oven pizza.

To make a snowman pizza simply create three different sizes and align them to make a snowman shape prior to baking.
https://livingfiresdotcodotuk.wordpress.com/2020/08/20/our-top-5-morso-pizza-oven-recipes/